Account Setup
Web Browser
When interacting with the POD user portal use a modern up-to-date web browser like Mozilla Firefox or Google Chrome. These web browsers can be installed on most desktop Operating System environments including: Windows, Linux and macOS. Please Note: Some features in the web portal will not work with Microsoft Internet Explorer.
Mozilla Firefox: https://www.mozilla.org/en-US/firefox/new/
Google Chrome: https://www.google.com/chrome/
Authentication using SSH Keys
You should have already created a POD portal account using your e-mail address and a password, you will also now need to setup SSH keys to access the compute resources on POD. The documentation on this page will help you with this task. Once completed you will have two sets of access credentials for POD:
E-mail address and password used for logging in with a Web Browser
Username and SSH key-pair used for logging in with an SSH client
SSH keys are a useful method of authentication. Instead of proving your identity with something you know, like a memorized password, you must provide something you have, a private SSH key file. Typically this is done automatically by an SSH Agent process running in the background. Some clients also support setting a path or directory location to the private file directly.
SSH Keys on Linux and macOS
As a Linux user you may already have an existing SSH key pair that you can use on POD. If so, you can easily add your public key to the POD portal Add an SSH Key form. By default, an existing public key should be located in your home directory: $HOME/.ssh/id_rsa.pub.
Create a new Key Pair
If you don’t have a key pair you would like to use on POD you can generate a new one. The -t rsa option specifies the type of key to create and the -C option is a comment field. When you manage more than one key this field can help you identify your keys. Follow the prompts, taking note of the install location of the key, usually $HOME/.ssh. When asked to enter and confirm a passphrase, choose a strong and well-secured passphrase. You will need to enter this passphrase to use your key.
$ ssh-keygen -t rsa -C "penguin@mylaptop"
Generating public/private rsa key pair.
Enter file in which to save the key (/home/penguin/.ssh/id_rsa):
Enter passphrase (empty for no passphrase):
Enter same passphrase again:
Your identification has been saved in id_rsa.
Your public key has been saved in id_rsa.pub.
The key fingerprint is:
SHA256:sc+GdfQhQqICl5WjRKsyIjxliJuwy3u23iXpnsCRuQM penguin@mylaptop
The key's randomart image is:
+---[RSA 2048]----+
|  ..oo... .      |
|. .oo.o. o       |
|o. +o.... . o .  |
|o+o.+.   o o o . |
|OE.+    S . . .  |
|+++ o .  = .     |
|.. = o .. +      |
|  .o= +  .       |
| .+oo=           |
+----[SHA256]-----+
$ cat /home/penguin/.ssh/id_rsa.pub
ssh-rsa AAAAB3NzaC1yc2EAAAADAQABAAABAQCsvctNQODHWNCAPdONfibjIW6YcMA1xvk/rmevRiTX
s1/QD68DVQWHyO5agOMwH4ve09QezcwMSanIuhn/rGVOd/XYoDd9AnMe2t0PFRl7ubPL2wswBUeVeryU
1HtF+nLpcGSBrzvrwP/UjcpctACUjajFBtsxS/R4n/tg6rLG3u2epCi9igUeUnfsBgR+r88wVTab3eNk
zNAXyzLJJZgulWXeShwFQYddecOTCdw9XXKwS9UQzuS8XCW0KgN02eNC/YlTvJITzm+eqktgVZKoW2zJ
v9iwcUIhXyWzJEUI7rPz7Pb1gXBp3Z/gJWQYc+81TDu9BMx0oIp7KWOB7rtf penguin@mylaptop
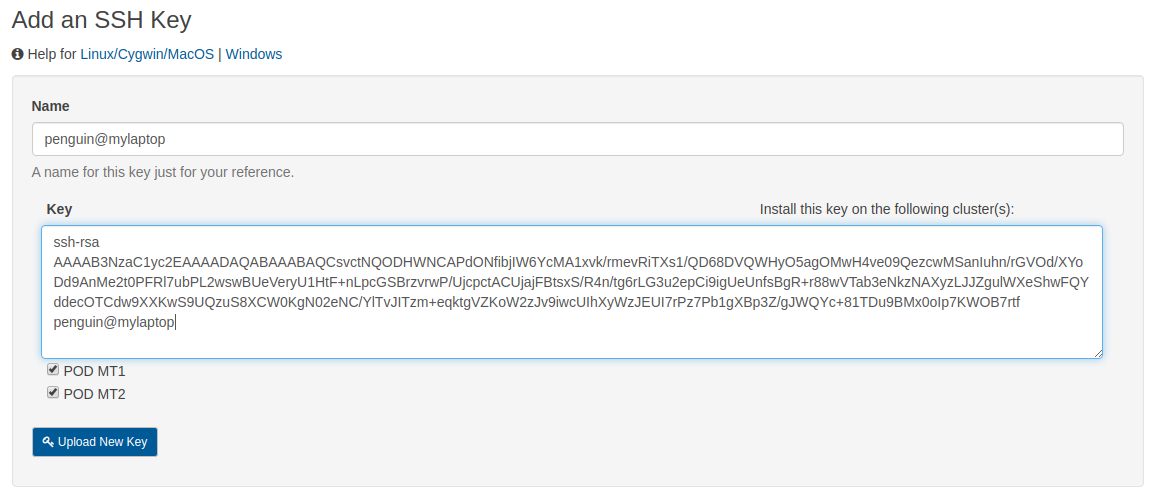
Add new Public Key to the POD Portal
The public portion of the newly created SSH key pair is now ready to be uploaded into the Add an SSH Key form.
Enter a name for your new public key in the Name textbox.
Select and copy the entire contents of the
~/.ssh/id_rsa.pubfile as a single line.Paste the public key string into the Key textbox.
Select the checkboxes for POD MT1 and POD MT2 to install your public key on both cluster locations.
Click the blue Upload New Key button to publish your private key
Load your Private Key and Connect
To make sure that your private key is loaded into your local authentication agent please use the ssh-add -l command to list the fingerprints for each identity loaded. If you don’t see your key listed then add it using the add-add command specifying the path to your private key. If your key is protected with a passphrase you will need to enter it now.
$ ssh-add -l
$ ssh-add ~/.ssh/id_rsa
Enter passphrase for /home/penguin/.ssh/id_rsa:
Identity added: /home/penguin/.ssh/id_rsa (/home/penguin/.ssh/.id_rsa)
$ ssh-add -l
2048 SHA256:sc+GdfQhQqICl5WjRKsyIjxliJuwy3u23iXpnsCRuQM penguin@mylaptop (RSA)
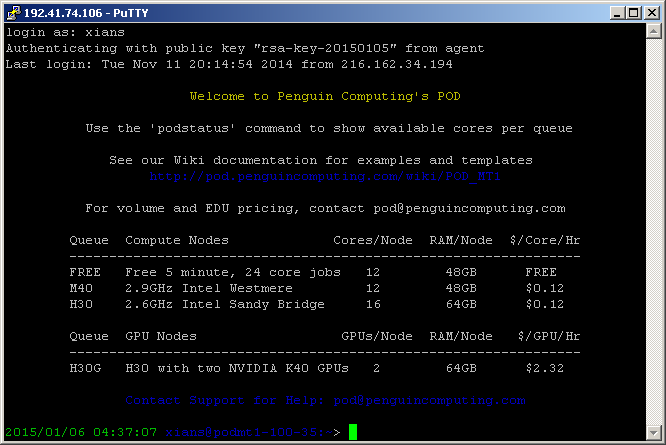
Now that your public key is shared with the POD user portal and your private key is loaded into your local authentication agent, you should be able to login and authenticate onto your POD login node without entering a password. Just make sure you are using your POD username and the hostname or IP address of your login node. These will be different for each user. The first time you try to access your login node you may need to add the host to your known hosts list. Respond yes to continue connecting.
$ ssh penguin@login-12-34.pod.penguincomputing.com
The authenticity of host 'login-12-34.pod.penguincomputing.com (192.41.12.34)' can't be established.
ECDSA key fingerprint is SHA256:+1uEXIaP3SxgRNsq5qGUxBEHomh18g3H6ZakmWozeBo.
Are you sure you want to continue connecting (yes/no)? yes
Warning: Permanently added 'login-12-34.pod.penguincomputing.com,192.41.12.34' (ECDSA) to the list of known hosts.

                       Welcome to Penguin Computing's POD

          Use the 'podstatus' command to show available cores per queue

                See our documentation for examples and templates
                 https://pod.penguincomputing.com/documentation

            Queue    Compute Nodes             Cores/Node  RAM/Node
            -------------------------------------------------------
            B30      2.4GHz Intel Broadwell        28       256GB
            S30      2.4GHz Intel Skylake          40       384GB

              Contact Support for Help: pod@penguincomputing.com

   * Use 'podstatus -v' to show available cores per queue based on duration
   * Use 'podstatus --help' for options to filter by queue, nodes, cores, duration

[penguin@podmt2-e0e974e ~]$
SSH Keys on Windows using PuTTY
We will walk through the steps required for Windows users to generate and install a SSH key using PuTTYgen. PuTTY is a widely used suite of ssh client programs for Windows. The private portion of the key pair is stored on the client Windows machine and the public part is uploaded to the POD cluster from the portal. For a more thorough introduction to SSH or public/private key concepts, visit OpenSSH.org. Use the following links to download and install any required software for Windows.
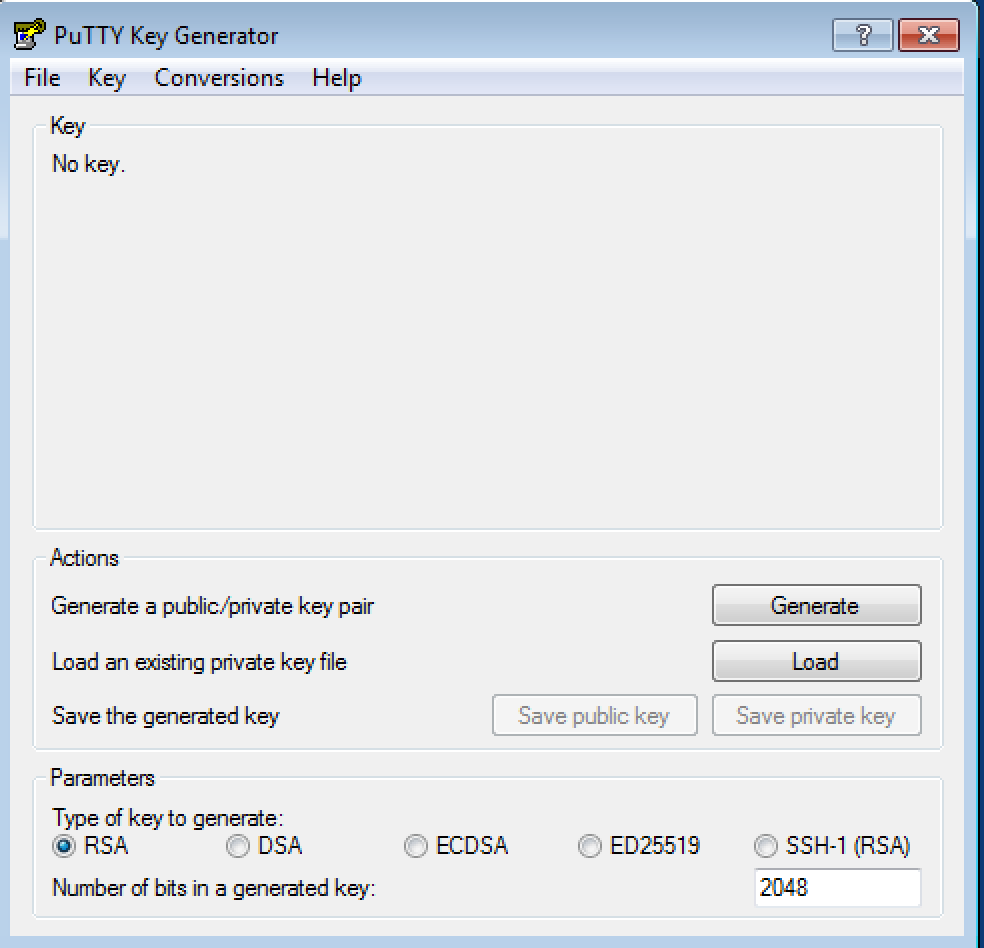
Creating a new Key Pair
Start PuTTYgen and generate a new public/private key pair or import an OpenSSH key by selecting Conversions/Import key. When generating the key you will have to move your mouse cursor inside the window to help generate some entropy:
After you generate or import an OpenSSH key, enter and confirm a passphrase before saving the private key:
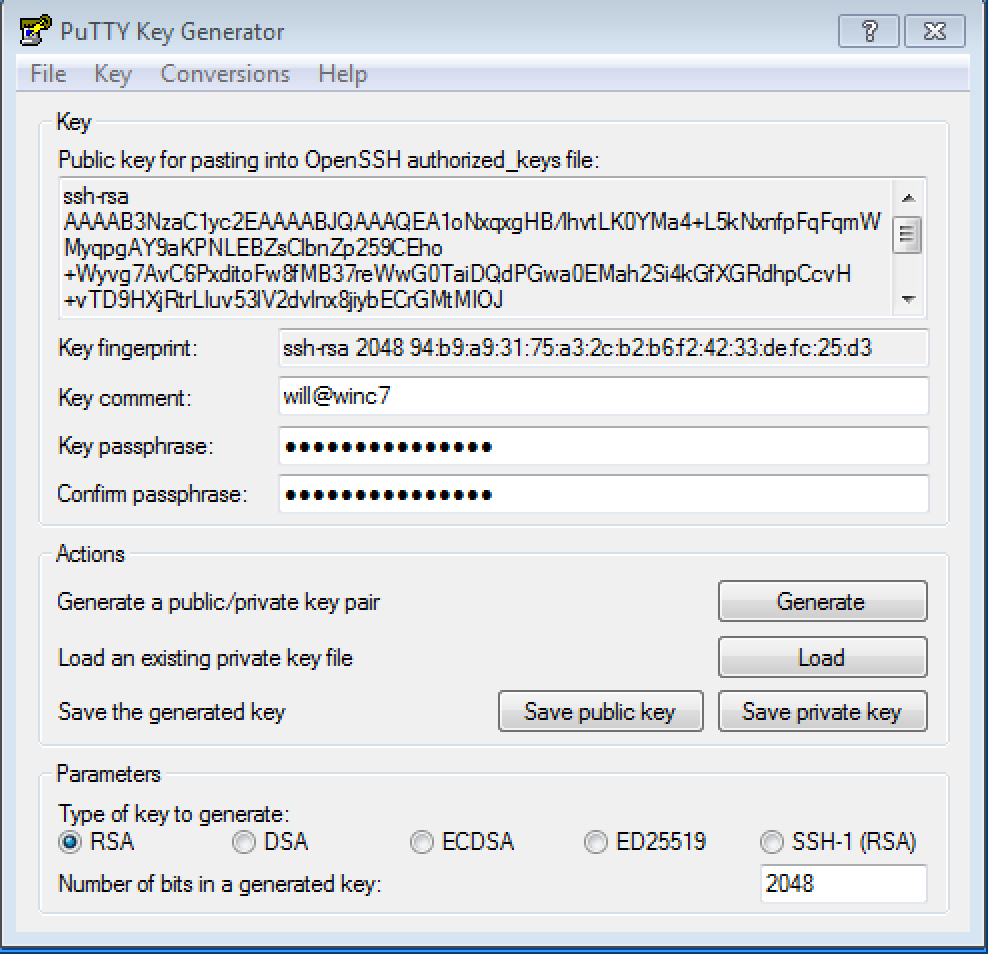
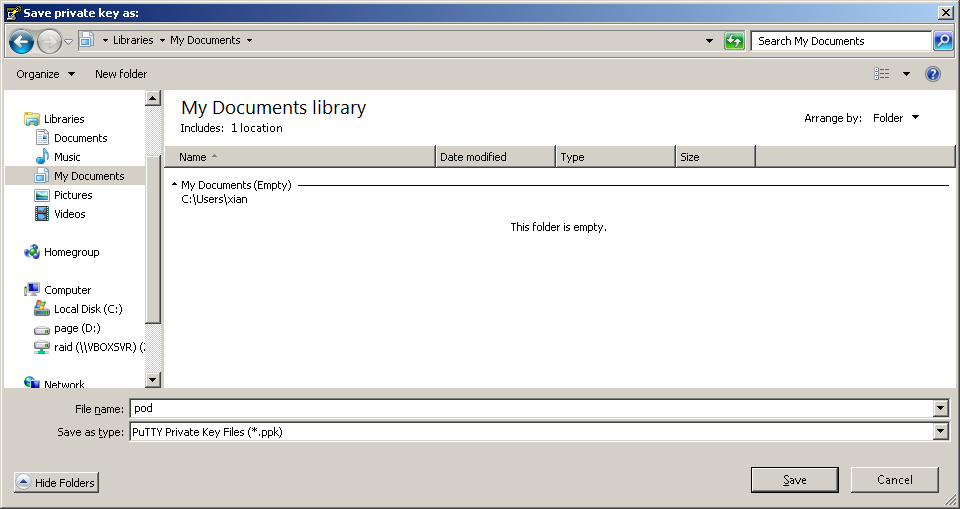
Save the key in a safe but accessible folder.
Add the Public Key to the POD Portal
Inside the PuTTYgen window, right-click and Select All to highlight all of the public key. Make sure you copy the entire string including the beginning that starts with
ssh-rsaand ends and the key-comment that may include the date by default:
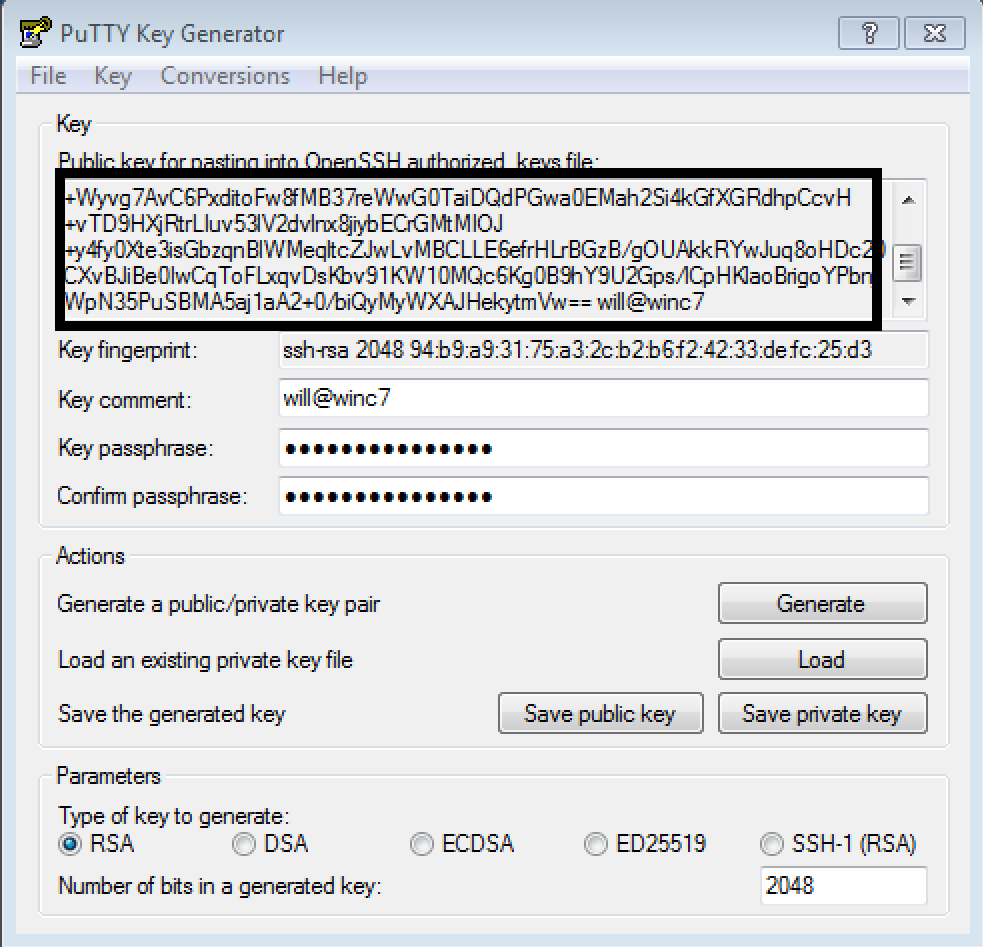
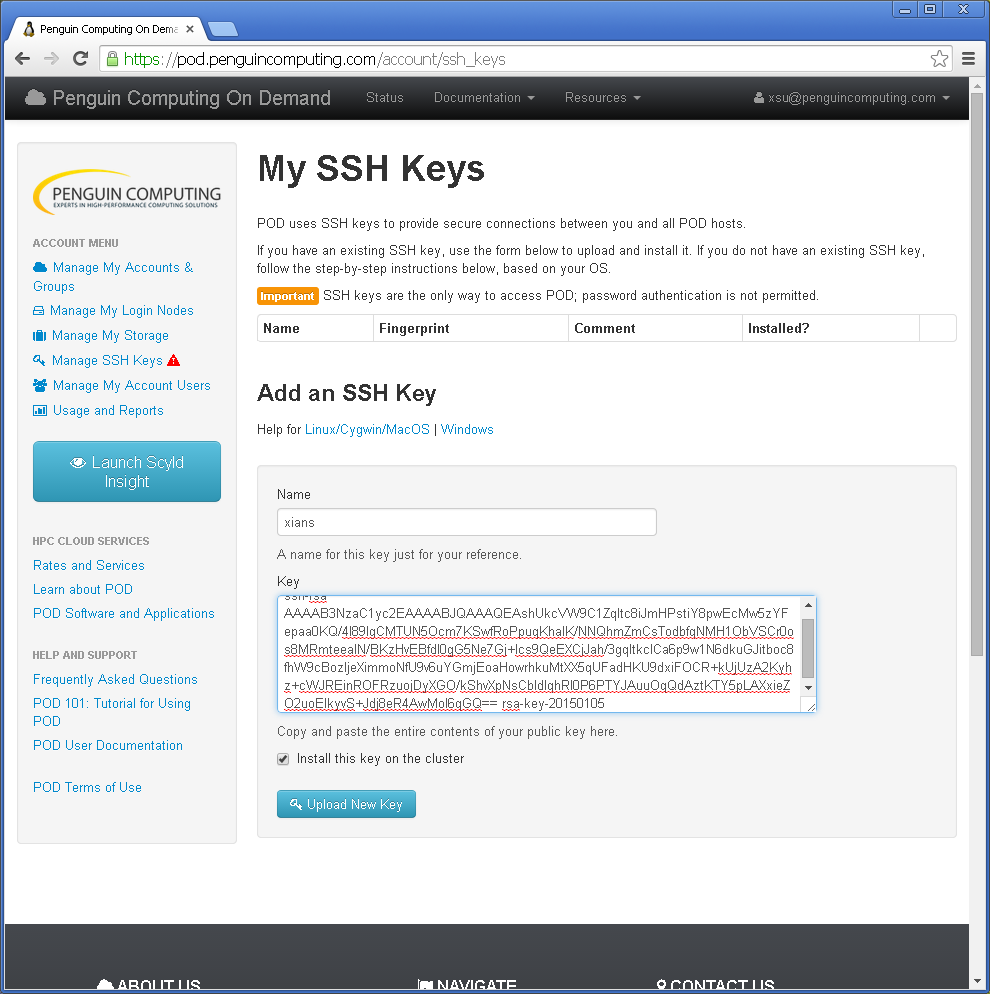
The public key is can now be pasted into the Key textbox on the Add an SSH Key form. Make sure to select the checkboxes for POD MT1 and POD MT2 to install your public key on both cluster locations:
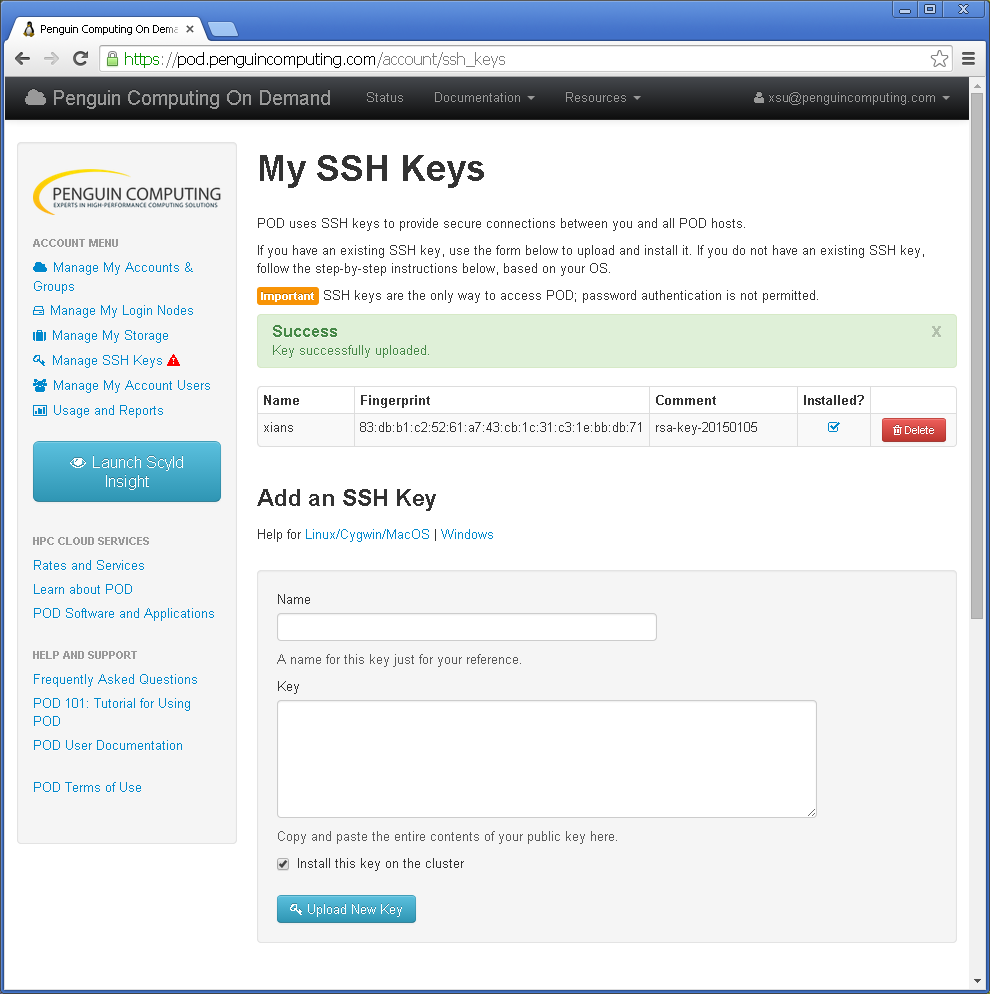
Once uploaded, you should then see the ssh key added to your account with a Success message:
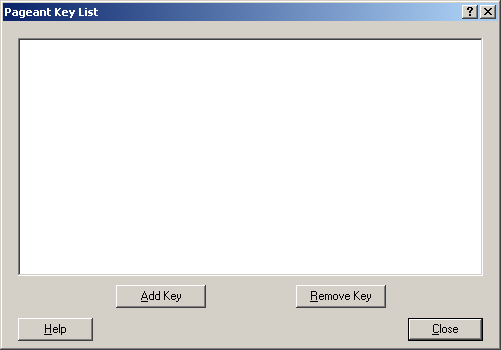
Start Pageant (Authentication Agent)
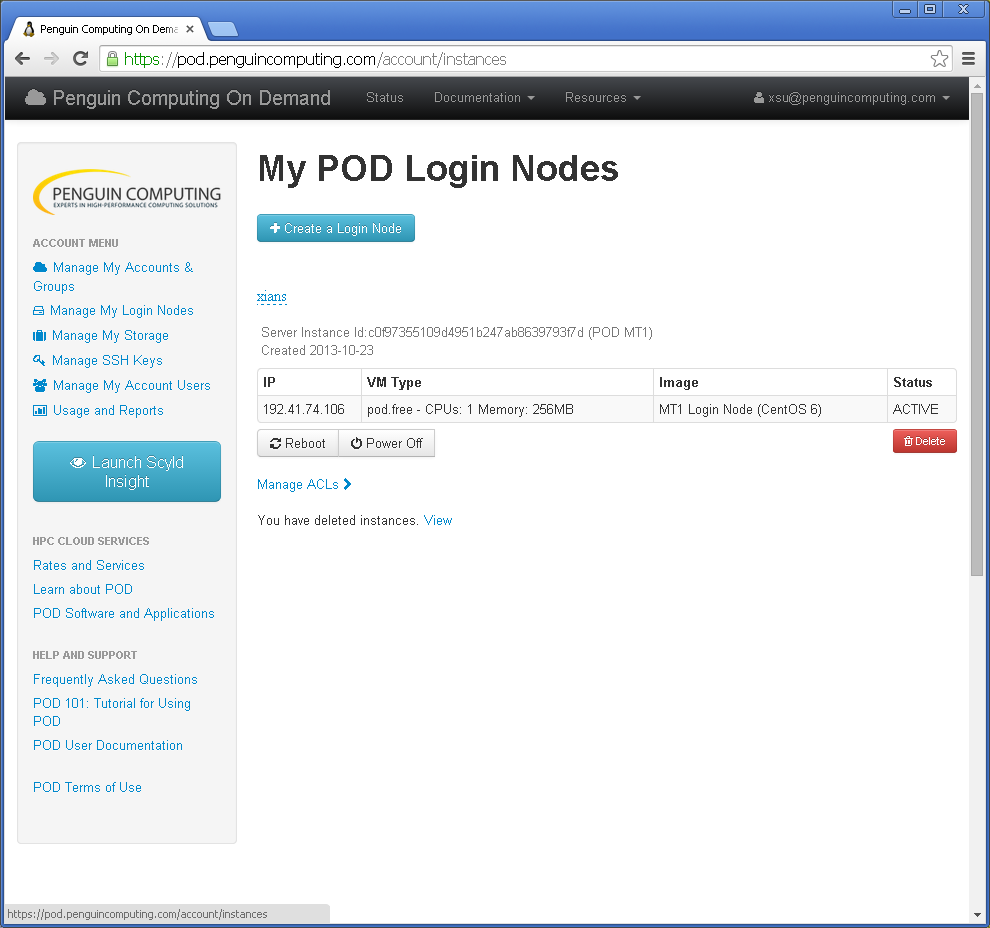
From your POD account, click Manage My Login Nodes and get the IP address:
Start the Pageant program using the Start Menu. It should be installed as part of the PuTTY suite of applications. Once running it will appear in your Windows system dock located near the clock on the desktop. You may need to right click the Pageant icon and select Manage Keys to open the Pageant Key List window:
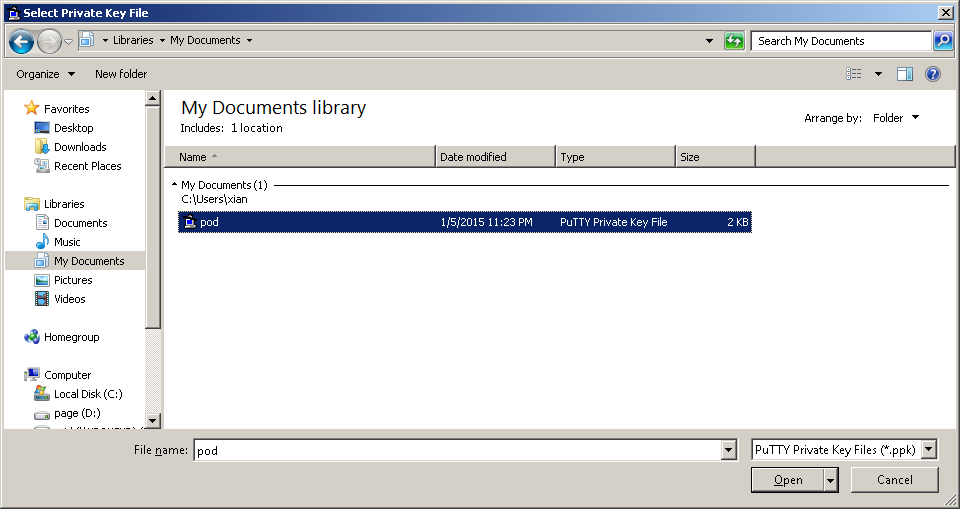
Add your new private key that you just saved to Pageant:
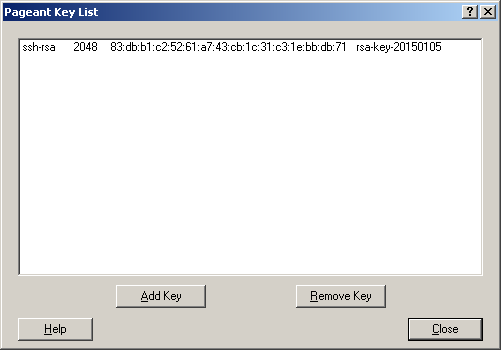
You should see your key in the Pageant Key List window. Please Note: Make sure this matches the fingerprint of the key listed in the POD Portal.
Connect to your Login Node with PuTTY
Please Note: Make sure Pageant is running!
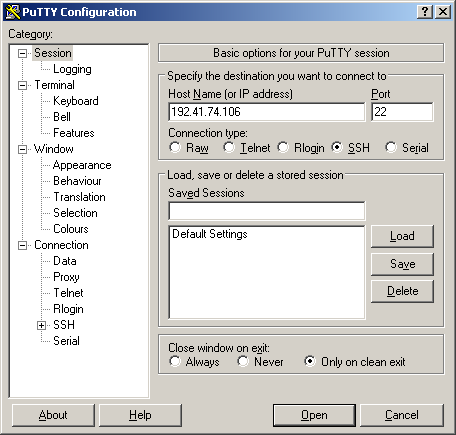
Run PuTTY using the Start Menu and enter your login node host name or IP address into the Host Name textbox. Make sure to save the session before opening.
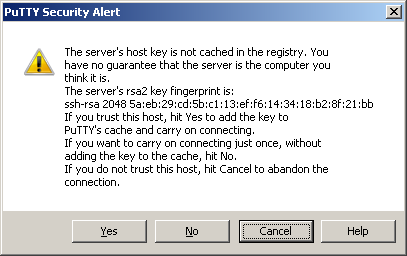
The first time you connect to a new login node, a security alert will pop up, click yes to accept the host key:
A console window will open prompting you for your POD username to login as. Enter in your POD System Account username. It should then authenticate you using the private key loaded into Pageant:
SSH Keys on Windows Using PowerShell
Microsoft announced it was bringing an integrated OpenSSH client to Windows back in 2015. In the April 2018 Windows 10 update, the built-in SSH client is now enabled in the optional feature apps section of Windows 10. This documentation will guide you though the steps to install a native OpenSSH client to your Windows OS.
Installing Windows 10 SSH Client
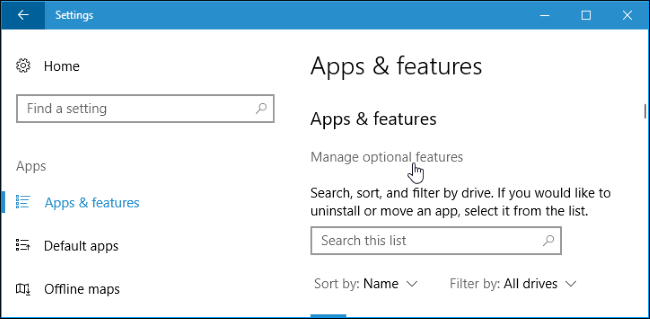
The SSH client is a part of Windows 10, but it is an “optional feature” that is not installed by default. You can either install it with the Graphical User Interface (GUI) or with the Command Line Interface (CLI).
GUI Install: Go to Settings > Apps and click “Manage optional features” under Apps & features:
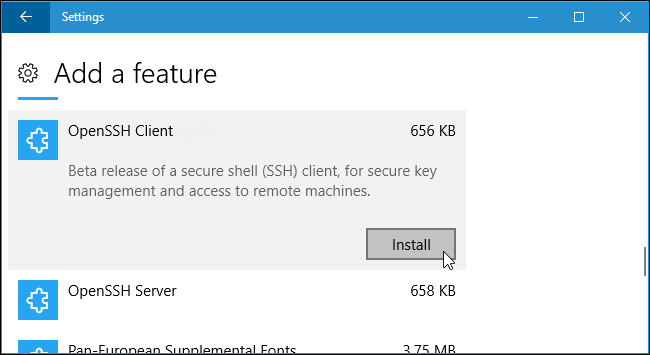
Now click “Add a feature” at the top of the list of installed features. If you already have the SSH client installed, it will appear in the list:

Scroll down, click the “OpenSSH Client” option, and click “Install”:
Restart your machine. Once you have restarted you will have a native OpenSSH client installed on your system.
CLI Install: Open an Administrative PowerShell window and run the following commands:
PS C:\Users\johnnyappleseed> Get-WindowsCapability -Online | ? Name -like 'OpenSSH.Client*'

Name  : OpenSSH.Client~~~~0.0.1.0
State : NotPresent

PS C:\Users\johnnyappleseed> Add-WindowsCapability -Online -Name OpenSSH.Client~~~~0.0.1.0

Path          :
Online        : True
RestartNeeded : False
Please Note: You may need to confirm that the ssh-agent is running in your services. Please follow the directions below to check.
Open a PowerShell windows and run the following:
PS C:\Users\johnnyappleseed> Get-Service ssh-agent

Status   Name               DisplayName
------   ----               -----------
Stopped  ssh-agent          OpenSSH Authentication Agent
As you can see under the “Status” the agent is not running. Run the following commands in the PowerShell windows:
PS C:\Users\johnnyappleseed> Set-Service 'ssh-agent' -StartupType Automatic
PS C:\Users\johnnyappleseed> Start-Service 'ssh-agent'
PS C:\Users\johnnyappleseed> Get-Service ssh-agent

Status   Name               DisplayName
------   ----               -----------
Running  ssh-agent          OpenSSH Authentication Agent
The “Status” is now running and moving forward the service will start automatically with windows. Restart your machine. Once you have restarted you will have a native OpenSSH client install on your system.
How to Setup SSH Keys
Once OpenSSH Client has been installed, you should have access to the following ssh commands from any Command Prompt:
ssh.exe
scp.exe
sftp.exe
ssh-add.exe
ssh-agent.exe
ssh-keygen.exe
ssh-keyscan.exe
The above OpenSSH binaries are located in C:\Windows\System32\OpenSSH\. SSH related files such as “know_hosts” and any user generated key pairs are located here is the relative %USERPROFILE%\.ssh\ or the absolute C:\Users\johnnyappleseed\.ssh\ path. We will be using the ssh-keygen.exe to create your public/private SSH key pair. This works in either a PowerShell window or a Command Prompt window, so use whichever you prefer. All the code examples from this section on are using PowerShell.
Please Note: It is recommended for security reasons that you NEVER share your private key with anyone and use a passphrase that only you know.
From a PowerShell window type:
PS C:\Users\johnnyappleseed\.ssh> ssh-keygen.exe -t rsa
Generating public/private rsa key pair.
Enter file in which to save the key (C:\Users\johnnyappleseed/.ssh/id_rsa):
Enter passphrase (empty for no passphrase):
Enter same passphrase again:
Your identification has been saved in C:\Users\johnnyappleseed/.ssh/id_rsa.
Your public key has been saved in C:\Users\johnnyappleseed/.ssh/id_rsa.pub.
The key fingerprint is:
SHA256:VW+V0gj2XvPCwuUbT402SZZja0I8d2+AbA1+5JDcO4k johnnyappleseed@DESKTOP-16DRCKD
The key's randomart image is:
+---[RSA 2048]----+
|          7      |
|  S      4       |
|      X          |
|    l            |
|       B         |
|                 |
|     1           |
|        3        |
|           8     |
+----[SHA256]-----+
PS C:\Users\johnnyappleseed\.ssh> explorer .
A file explorer window opened up from the PowerShell prompt. You should see two file:

The first file (id_rsa) is your private key. The second file (id_rsa.pub) is your public key. You will need to open the public key with Notepad or some other text editor. Now copy all of the public key and go to the POD Portal and sign in. Then navigate to and select “SSH Keys”. Under the section “Add an SSH Key” you will give the “Name” of the public key and paste the public key you copied into the “Key” section. Make sure to select which cluster you want the newly generated SSH key to be added too. Then select the “Upload New Key”. You will see the new key with a banner saying something like “Success Key successfully uploaded.” Now you are ready to use SSH!
Please Note: If you use a passphrase and forget it, then you will have to create a new key pair. There is no way to recover a lost passphrase.
How to Use Windows 10 SSH Client
You can now use the SSH client by running the ssh command. This works in either a PowerShell window or a Command Prompt window, so use whichever you prefer.
To open a PowerShell window, right-click the Start button or press Windows+X and choose “Windows PowerShell” from the menu. To view the syntax of the ssh command run as seen below:
PS C:\Users\johnnyappleseed> ssh
usage: ssh [-46AaCfGgKkMNnqsTtVvXxYy] [-B bind_interface]
           [-b bind_address] [-c cipher_spec] [-D [bind_address:]port]
           [-E log_file] [-e escape_char] [-F configfile] [-I pkcs11]
           [-i identity_file] [-J [user@]host[:port]] [-L address]
           [-l login_name] [-m mac_spec] [-O ctl_cmd] [-o option] [-p port]
           [-Q query_option] [-R address] [-S ctl_path] [-W host:port]
           [-w local_tun[:remote_tun]] destination [command]
This command works the same as connecting to an SSH server by the way of the ssh command on other operating systems like macOS or Linux. The syntax or command line options, are the same.
Now before we connect to one of the POD nodes, we want to make sure your SSH key is added. Run the following command ssh-add $Your_Priavte_SSH_Key in the directory where your private SSH key is located:
PS C:\Users\johnnyappleseed\.ssh> ssh-add .\johnnyappleseed
Identity added: .\johnnyappleseed (.\johnnyappleseed)
PS C:\Users\johnnyappleseed\.ssh> ls

    Directory: C:\Users\johnnyappleseed\.ssh

Mode                LastWriteTime         Length Name
----                -------------         ------ ----
-a----         3/9/2019   9:18 PM            408 authorized_keys
-a----        7/29/2019  11:09 AM           1679 johnnyappleseed
-a----        7/29/2019  11:22 AM            414 johnnyappleseed.pub
-a----        7/29/2019  11:23 AM            384 known_hosts
You can see that your Private key Identity has now been added. We can also check that your identity has been added by running:
PS C:\Users\johnnyappleseed\.ssh> ssh-add -l
2048 SHA256:uDQpHUr/zF0G7P38BgU2yWMSlviPVBtX4O+QEy5PKaw .\johnnyappleseed (RSA)
We are now ready to connect into a POD node.
Please Note: Make sure the username used when connecting to any POD node, is the one you created when first setting up your POD account. Be aware that the user name is case sensitive.
We are now ready to connect into a POD node using SSH with the username johnnyappleseed. To do so, run the following:
PS C:\Users\johnnyappleseed> ssh johnnyappleseed@login-12-34.pod.penguincomputing.com
By default, the command attempts to connect to an SSH server running on port 22.
Please Note: Before you try to SSH into one of your login nodes, make sure you have setup your SSH public/private keys setup, otherwise you will not be able to connect into any of your POD nodes.
The first time you connect to any system with SSH, you will be prompted to accept the hosts key as seen below:
PS C:\Users\johnnyappleseed> ssh johnnyappleseed@login-12-34.pod.penguincomputing.com
The authenticity of host 'login-12-34.pod.penguincomputing.com (192.41.12.34)' can't be established.
ECDSA key fingerprint is SHA256:+1uEXIaP3SxgRNsq5qGUxBEHomh18g3H6ZakmWozeBo.
Are you sure you want to continue connecting (yes/no)?
You have established a connect with POD and it is asking you “Are you sure you want to continue connecting (yes/no)?”. Type “yes” to continue accessing your node as seen below:
Are you sure you want to continue connecting (yes/no)? yes
Warning: Permanently added 'login-12-34.pod.penguincomputing.com,192.41.12.34' (ECDSA) to the list of known hosts.
                       Welcome to Penguin Computing's POD

          Use the 'podstatus' command to show available cores per queue

                See our documentation for examples and templates
                 https://pod.penguincomputing.com/documentation

            Queue    Compute Nodes             Cores/Node  RAM/Node
            -------------------------------------------------------
            B30      2.4GHz Intel Broadwell        28       256GB
            S30      2.4GHz Intel Skylake          40       384GB

              Contact Support for Help: pod@penguincomputing.com

   * Use 'podstatus -v' to show available cores per queue based on duration
   * Use 'podstatus --help' for options to filter by queue, nodes, cores, duration

[johnnyappleseed@podmt2-e0e974e ~]$
You are now connected to the remote node using SSH!
Remote File Management
Typically users will need to upload input and application files to their POD login nodes and download results and output files after a job completes. There are many ways to manage your files on POD, however we recommend using a desktop application like WinSCP or FileZilla. These applications can be installed locally and allow you to connect to your POD login node. This section of the documentation will describe how to configure and run these application on a Windows desktop machine. Use the following links to download and install any required software for Windows.
FileZilla: https://filezilla-project.org/download.php
Update to the latest application version using the links above. If you already have one or both applications installed on your local system, then the sections below will give examples on how to connect to your login nodes on POD.
Managing Files on Your Login Node With WinSCP
WinSCP (Windows Secure Copy) is a free and open-source file manager for Windows. Its main function is, to secure file transfer between a local and a remote computer. Beyond this, WinSCP offers basic file manager and file synchronization functionality. For secure transfers, it uses Secure Shell (SSH) and supports the SCP protocol in addition to SFTP.
Please Note: Make sure Pageant is running and your private key is loaded!
Configuration: Setup and connect to your POD login node
Authentication: Authentication using SSH keys and Two-Factor Authentication codes (if enabled)
File Management: Upload and download files to/from your POD home directory
WinSCP Login Configuration
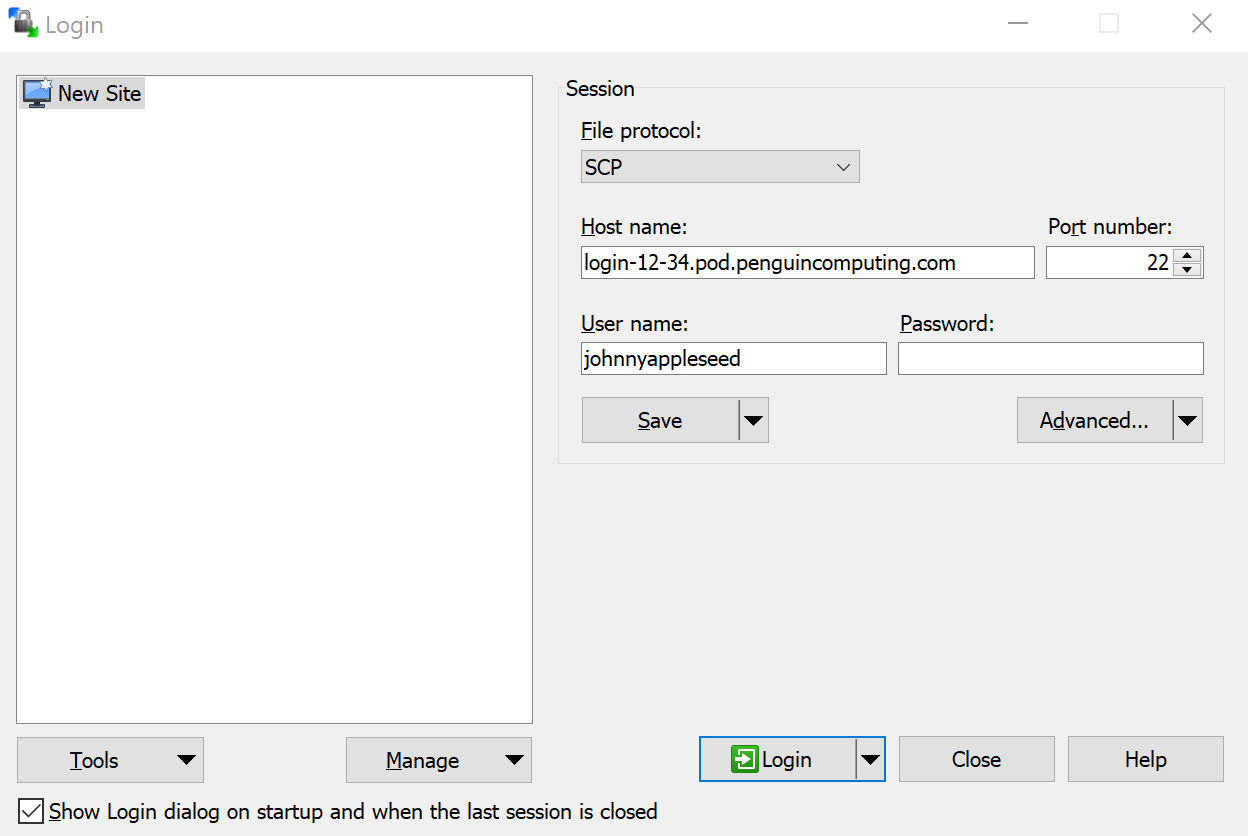
You will first need your POD login node hostname/IP, so you can connect to POD using WinSCP. Login into the POD portal, then navigate to the POD login node that you want to connect to and copy the hostname/IP. It is good practice on POD, if you have not logged into your POD portal in over a month, that you login to confirm you have the correct login node hostname/IP.
Once you have the hostname/IP, you can open WinSCP. You will see a login configuration window. Select the New Site and fill out the Session paramenters to connect to your POD login node as described below:
File Protocol: Select
SFTPorSCPfrom the drop-down menuHost: Enter your POD login node hostname/IP into the Host name textbox. For example:
login-12-34.pod.penguincomputing.comPort: In the Port number section add port
22User: Enter Your POD username into the User name textbox. For example:
johnnyappleseed
Once everything is configured, click the Save button and give the new setup a Site name for future reference in WinSCP. To initiate a connection to your POD login node. Select the new site name you created and hit “Login”
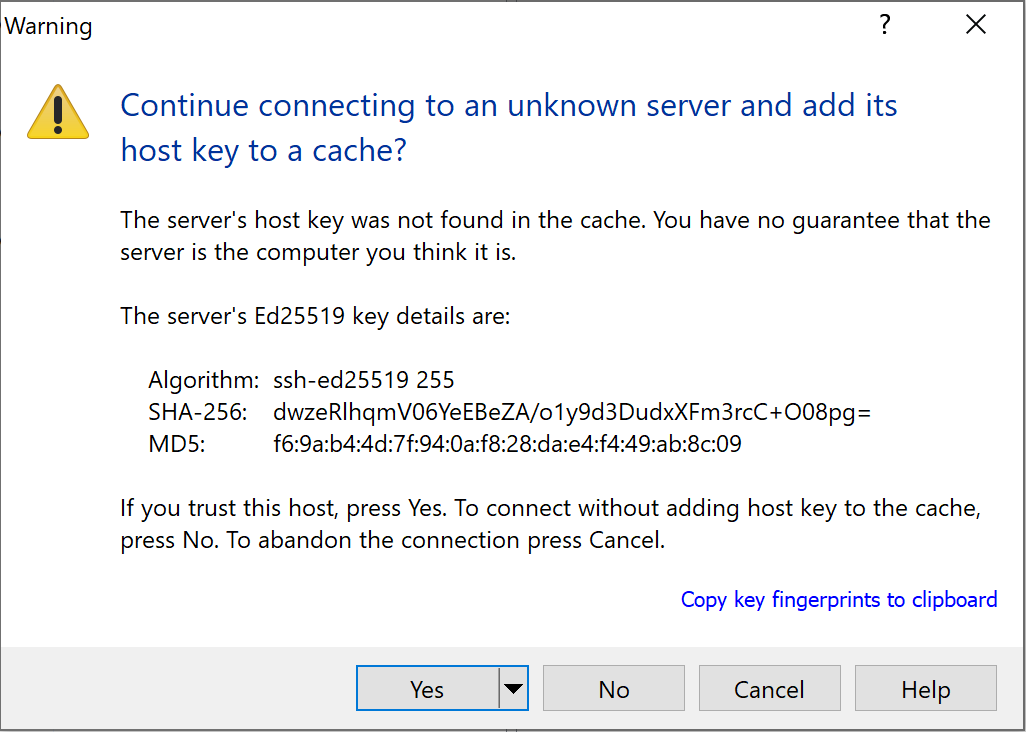
If this is the first time connecting to your login node you will need to accept the unknown server hostkey. This can be done by selecting “Yes”. The next time you connect the hostkey should match the cache and you will not be prompted.
WinSCP Two-Factor Authentication (if enabled)
As long as your authentication agent (Pagent) is running and your private SSH key is loaded; WinSCP should connect to your login node automatically. If your account uses Two-Factor Authentication, then you must respond to an additional challenge and provide a Verification Code.
You should have already setup a Two-Factor Authentication application on your phone. Open the application and enter the current 6-digit code for your POD account into the Verification code: textbox and click the “OK” button. If the code is valid you should authenticate successfully.
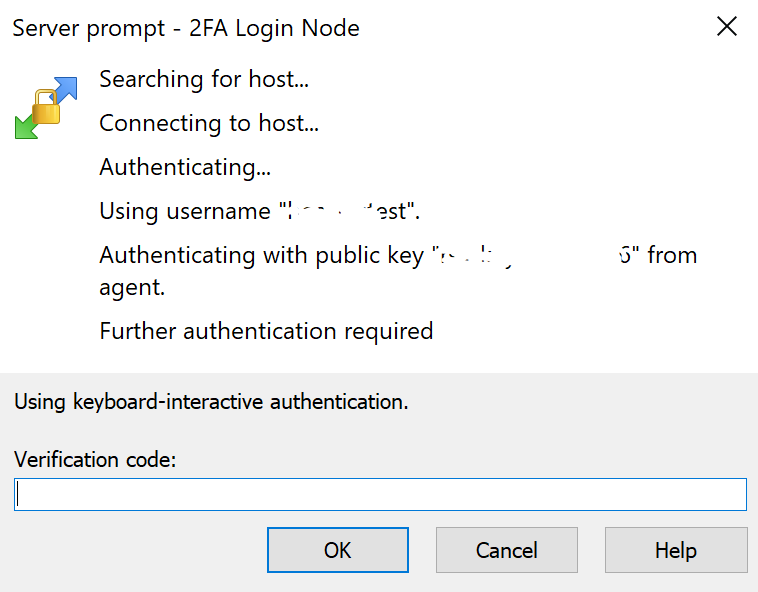
Please Note: You may be prompted for additional verification codes as you use WinSCP to manager your files.
WinSCP File Management
Once you have authenticated to your POD login node, you should see a directory tree listing for both the local (left) and remote (right) sites. Select directory names and navigate to the location on both the local and remote sites. Then you can select the file(s) or folder(s) to upload on the local and drag over to the remote. Conversely, you can do the same from the remote to the local.
In this example, we have navigated to the local directory C:\Users\johnnyappleseed\Documents\ where you can see the file Local_Files_to_be_transfered_up_to_POD.txt. On the remote, you will see the our POD home directory, which is located /home/johnnyappleseed/. To download the test.sub submission script, select the script on the remote and drag it to the local site. A new “Download” window will appear; Select “OK”. Then the transfer will begin. To upload a file or folder to POD, you will follow the same process in reverse.

Managing Files on Your Login Node With FileZilla
FileZilla is a useful application, that allows you to upload, download, and manage files in your home directories on the POD clusters. It is available for most Operating Systems including Windows, Linux, and MacOS. This section of the documentation uses the MacOS, however the screenshots should be the same for any Operating System.
Please Note: Make sure your private SSH key is loaded into your local SSH authentication agent. For Windows systems this may be ssh-agent or Pageant; while on Linux and MacOS systems this would most-likely be ssh-agent.
Configuration: Setup and connect to your POD login node
Authentication: Authentication using SSH keys and Two-Factor Authentication codes (if enabled)
File Management: Upload and download files to/from your POD home directory
FileZilla Site Manager Configuration
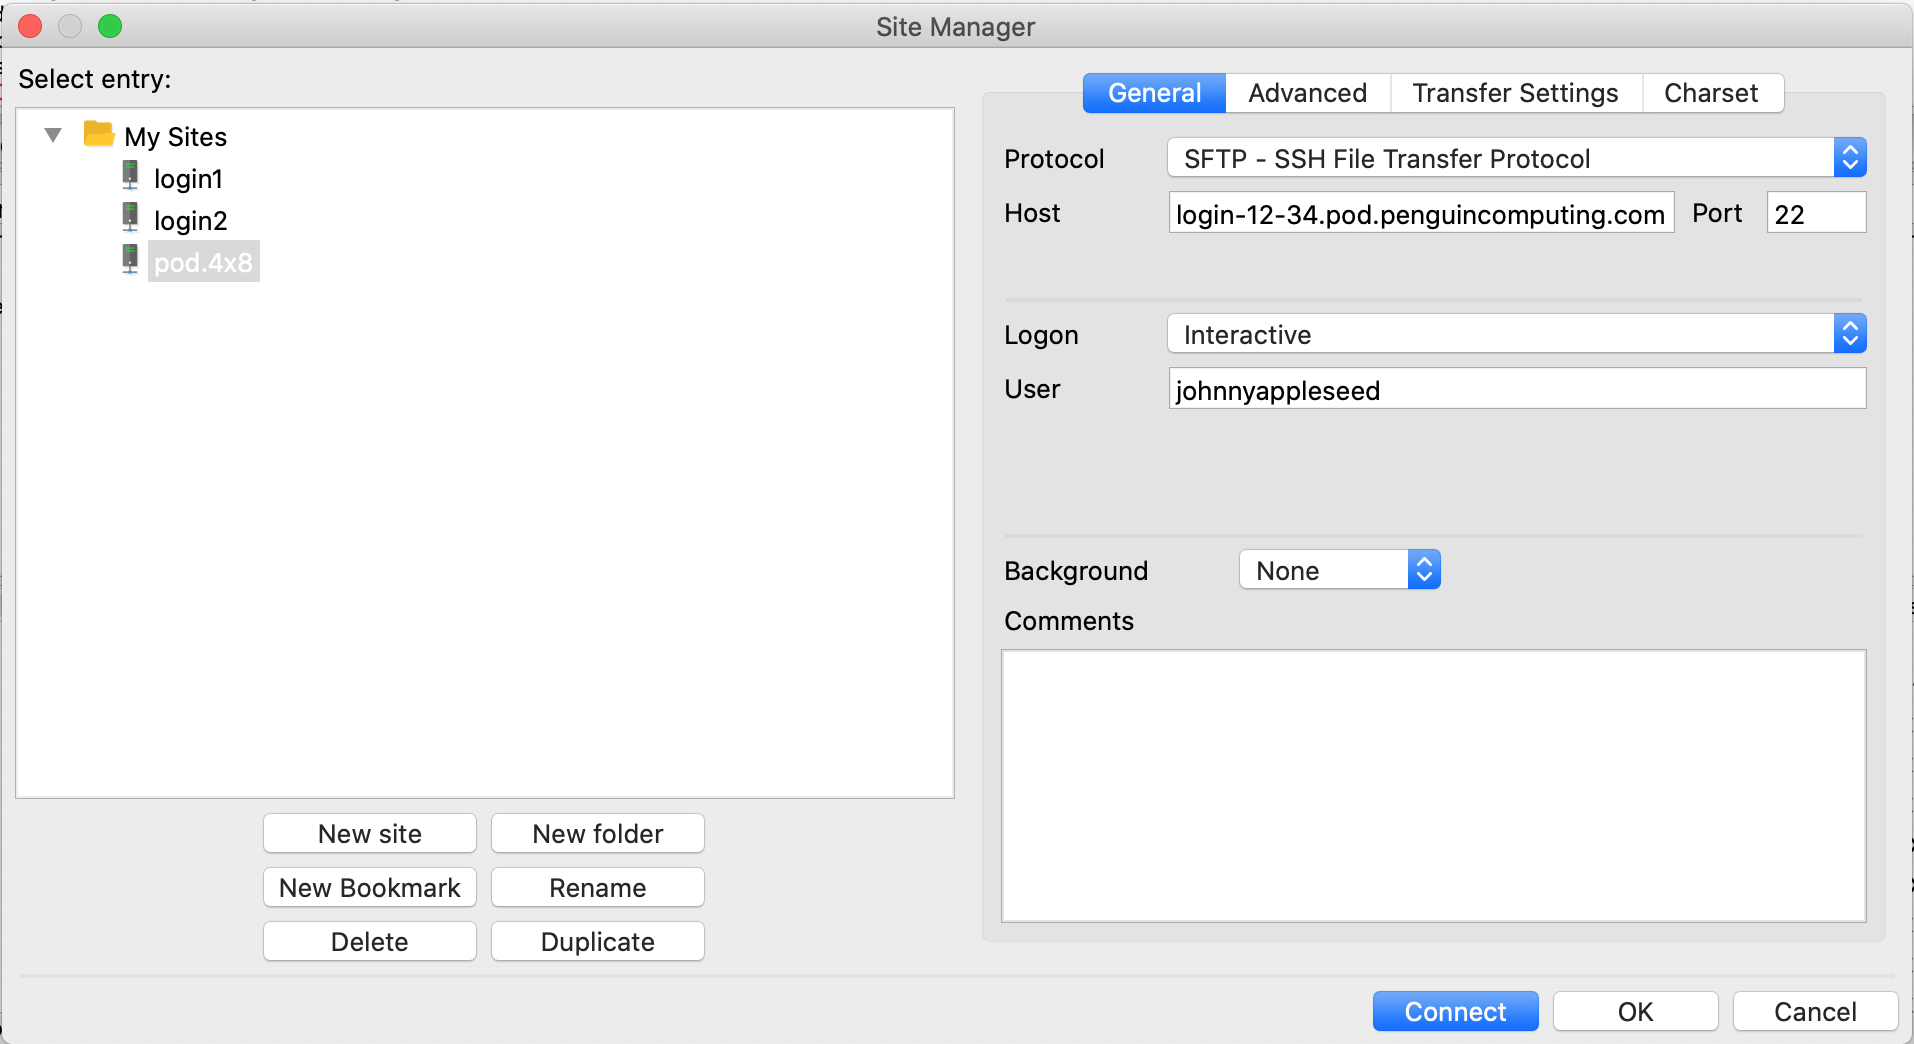
We highly recommend configuring a site in the FileZilla Site Manager for your login node. POD login node IP addresses and hostnames may change as they are deleted and recreate so its best to document the current hostname and IP address for your login node from the POD user portal.
Open FileZilla and click the Site Manager icon to open the Site Manager configuration window. You can also open the Site Manager by selecting File > Site Manager from the application menu bar. Click the New site button to create an empty site definition under My Sites. You should now enter a relevant name. Here we use pod.4x8. Finally, update the parameters under the General tab as described below.
Protocol: Select
SFTP - SSH File Transfer Protocolfrom the Protocol drop-down menu.Host: Enter your login node hostname into the Host textbox. For example:
login-12-34.pod.penguincomputing.com.Logon: Select
Interactivefrom the Logon drop-down menu.User: Enter Your POD username into the User textbox. For example:
johnnyappleseed.
Once everything is configured click the Connect button to initiate a connection to your POD login node. FileZilla will automatically save this site configuration.
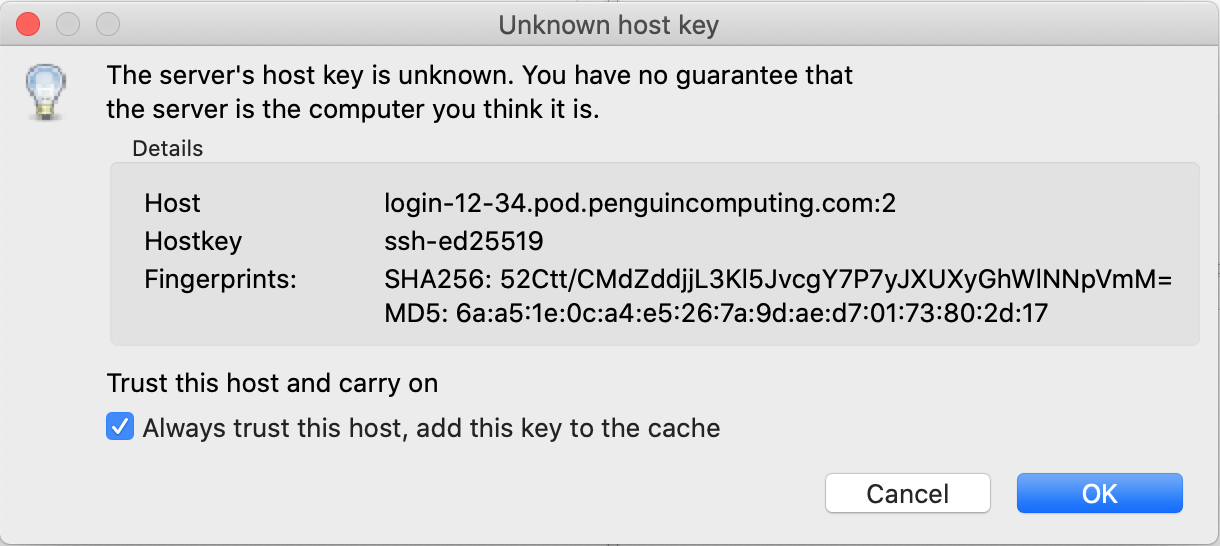
If this is the first time connecting your login node you will need to accept the unknown hostkey. Accept the new hostkey selecting the checkbox next to Always trust this host, add this key to the cache and click the OK button. The next time you connect the hostkey should match the cache and you will not be prompted.
FileZilla Two-Factor Authentication (if enabled)
As long as your authentication agent is running and your private SSH key is loaded FileZilla should connect to your login node automatically. If your account uses Two-Factor Authentication then you must respond to an additional challenge and provide a Verification Code.
You should have already setup a Two-Factor Authentication application on your phone. Open the application and enter the current 6-digit code for your POD account into the Password textbox and click the OK button. If the code is valid you should authenticate successfully.

Please Note: You may be prompted for additional codes as you use FileZilla to manager your files.
FileZilla File Management
If authentication is successful you should see a directory tree listing for both the local and remote sites. Select directory names to navigate to that location on both the local and remote sites. You can also click the arrows next to each directory to expand the tree listing to display the contents of that directory.
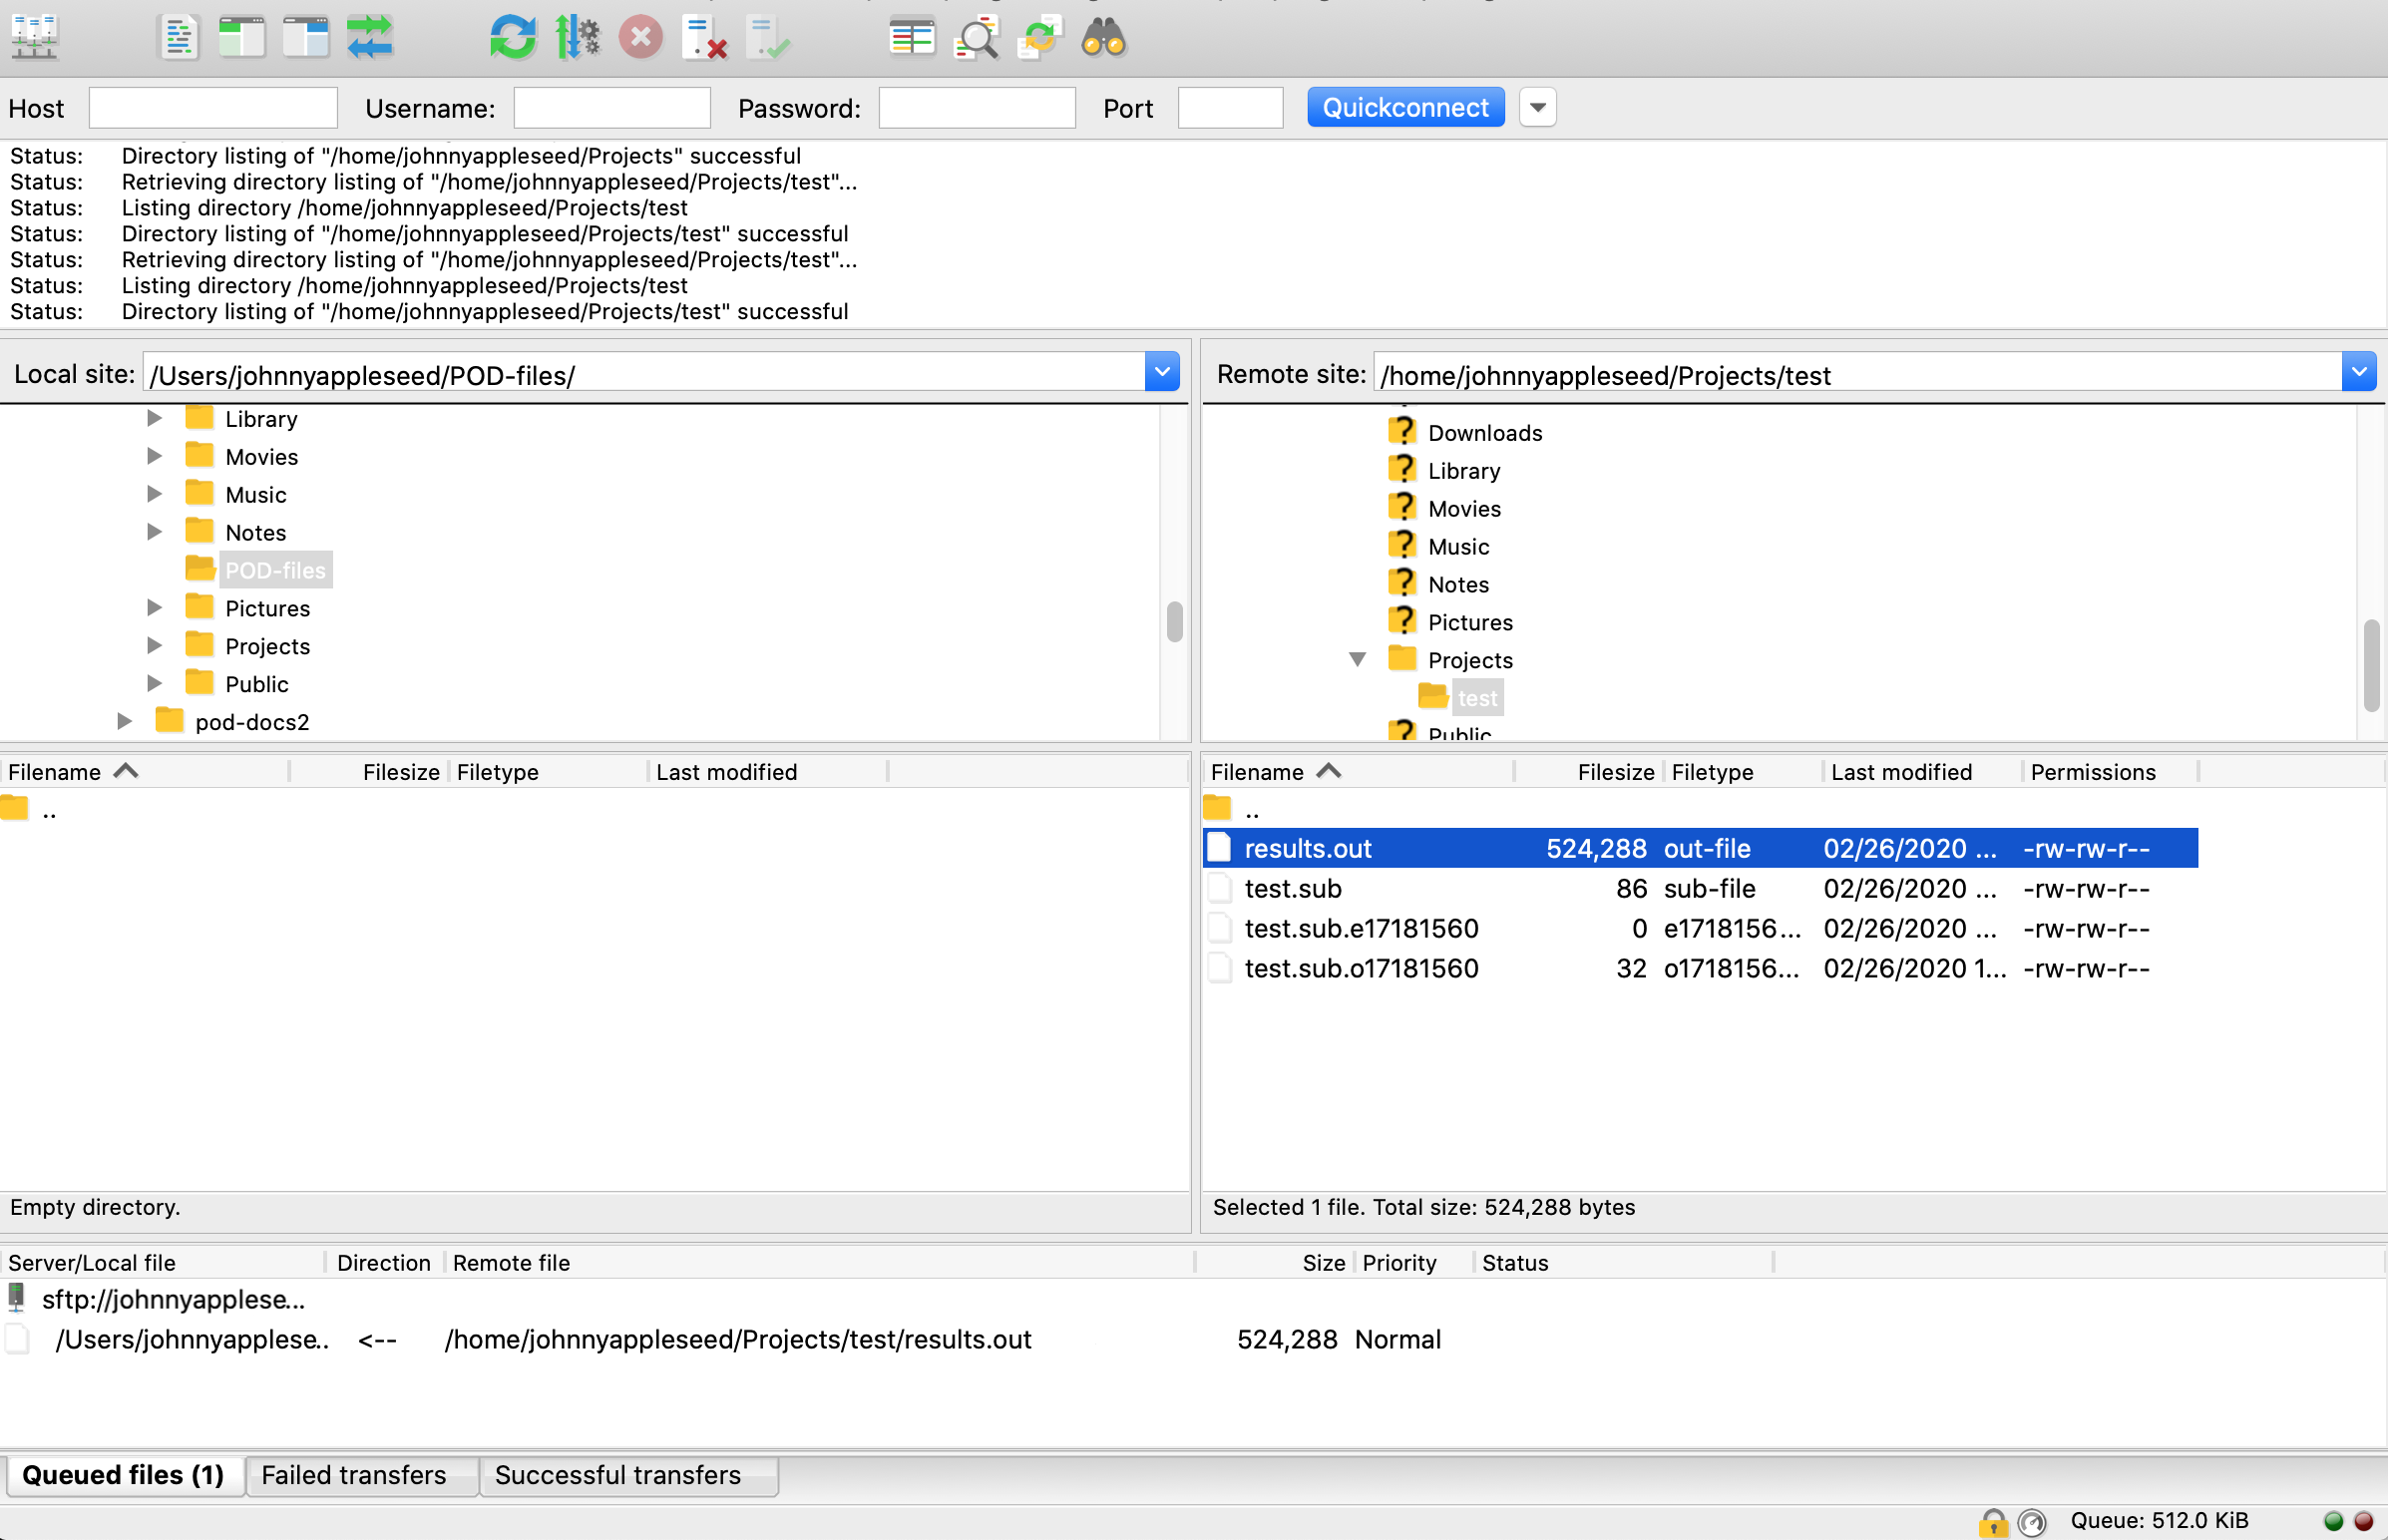
In this example, we have navigated to the Local site directory /Users/johnnyappleseed/POD-files where we will download a results file from our POD home directory. On the Remote site we have also navigated to the /home/johnnyappleseed/Projects/test directory which contains the output and results from a simple test job. To download the results.out file simply click and drag it from the remote site to the local site. The transfer will show in the Queued files tab at the bottom of the screen and begin transferring. To upload files select a directory or file on the Local site and drag it to the Remote site.
Managing Files on Your Login Node With PowerShell
Once you have followed the configuration section SSH Keys on Windows Using PowerShell, you will need to confirm which SSH identity you are using in PowerShell to login to POD. You can do this by running the following command below:
PS C:\Users\johnnyappleseed> cd .\.ssh\
PS C:\Users\johnnyappleseed\.ssh> ssh-add.exe .\id_rsa
Identity added: .\id_rsa (.\id_rsa)
PS C:\Users\johnnyappleseed\.ssh> ssh-add.exe -l
2048 SHA256:sc+GdfQhQqICl5WjRKsyIjxliJuwy3u23iXpnsCRuQM .\id_rsa (RSA)
PS C:\Users\johnnyappleseed\.ssh>
Make sure on your POD Portal account, that your public SSH key has been added or you will not be able to login to any of your POD login nodes. Once you have confirmed your public SSH key is loaded on your local machine and on the POD portal, you are ready to do a quick test. Here is an example logging into MT2 below:
PS C:\Users\johnnyappleseed\.ssh> ssh johnnyappleseed@login-12-34.pod.penguincomputing.com
The authenticity of host 'login-12-34.pod.penguincomputing.com (192.41.12.34)' can't be established.
ECDSA key fingerprint is SHA256:IOdH4PVxt8SJs40mCy0RNjPTLy4+ZxYpLoAqr8I83ro.
Are you sure you want to continue connecting (yes/no)? yes
Warning: Permanently added 'login-12-34.pod.penguincomputing.com,192.41.12.34' (ECDSA) to the list of known hosts.
                       Welcome to Penguin Computing's POD

          Use the 'podstatus' command to show available cores per queue

                See our documentation for examples and templates
                 https://pod.penguincomputing.com/documentation

            Queue    Compute Nodes             Cores/Node  RAM/Node
            -------------------------------------------------------
            B30      2.4GHz Intel Broadwell        28       256GB
            S30      2.4GHz Intel Skylake          40       384GB

              Contact Support for Help: pod@penguincomputing.com

   * Use 'podstatus -v' to show available cores per queue based on duration
   * Use 'podstatus --help' for options to filter by queue, nodes, cores, duration

[johnnyappleseed@podmt2-a59f5b5 ~]$
Now that your identity file is test, loaded, and working when SSHing into a login node. We are ready to manage files using built-in PowerShell tools as seen below:
sftp.exe
scp.exe
In the next sections you will be given example on how to use them. Keep in mind that the only difference in PowerShell with having Two-Factor Authentication enabled; is that you will be asked for a “Verification code:”. The rest of the steps will be the same as if you did not have Two-Factor Authentication enabled.
PowerShell using SFTP
SFTP stands for SSH file transfer protocol. SFTP is a secure protocol for transferring files. SFTP uses a client and server connection to facilitate file transfer and is a preferred option over FTP, which has no encryption. We can establish an SSH connection and then open up an SFTP session using that connection by issuing the following command:
PS C:\Users\johnnyappleseed> sftp johnnyappleseed@login-12-34.pod.penguincomputing.com
Verification code: <-- If you have 2FA enabled
Connected to johnnyappleseed@login-12-34.pod.penguincomputing.com.
sftp>
To view the SFTP options, simply type help when connected to an SFTP session. Below is an example of uploading a file to a POD login node:
sftp> put Test-Upload.txt
Uploading Test-Upload.txt to /home/johnnyappleseed/johnnyappleseed-shared/Test-Upload.txt
Test-Upload.txt                                                100%   63     4.0KB/s   00:00
sftp> ls
Test-Upload.txt
sftp> bye
PS C:\Users\johnnyappleseed\Downloads>
Here is an example of downloading a file from a POD login node:
sftp> get Test-Download.txt
Fetching Test-Download.txt to C:\Users\johnnyappleseed\Downloads
Test-Downlaod.txt                                              100%   63     4.0KB/s   00:00
sftp> lls
Test-Download.txt
sftp> bye
PS C:\Users\johnnyappleseed\Downloads> dir

    Directory: C:\Users\jhoskins\Downloads

Mode                LastWriteTime         Length Name
----                -------------         ------ ----
-a----              01/01/1970 1:30 AM        34 Test-Download.txt

PS C:\Users\johnnyappleseed\Downloads>
You now know how to use SFTP with PowerShell!
PowerShell using SCP
SCP (secure copy) is a command-line utility that allows you to securely copy files and directories between two locations. When transferring data with SCP, both the files and password are encrypted, so that anyone snooping on the traffic cannot see anything sensitive. In this section, you will see how to use the SCP command through practical examples and detailed explanations of the most common SCP options. Before we beging, we will start with basic syntax for the utility SCP:
scp [OPTION] [user@]SRC_HOST:]file1 [user@]DEST_HOST:]file2
OPTION - SCP options such as ssh configuration, limit, ssh port, cipher… etc.
[user@]SRC_HOST:]file1 - Source file.
[user@]DEST_HOST:]file2 - Destination file.
Here is an example of the information above:
PS C:\Users\johnnyappleseed\Downloads> scp .\scp-test-upload.txt johnnyappleseed@login-12-34.pod.penguincomputing.com:/home/johnnyappleseed/johnnyappleseed-shared
Verification code: <-- If you have 2FA enabled
scp-test-upload.txt                                                   100%  63   4.0KB/s   00:00
PS C:\Users\johnnyappleseed\Downloads>
Local files should be specified using an absolute or relative path while remote file names should include a user and host specification. SCP provides a number of options that control every aspect of its behavior. The most widely used options are:
-p - Preserves files modification and access times.
-q - Use this option if you want to suppress the progress meter and non-error messages.
-C - This option will force SCP to compresses the data as it is sent to the destination machine.
-r - This option will tell SCP to copy directories recursively.
Below are some examples from the options above:
PS C:\Users\johnnyappleseed\Downloads> scp -Cp .\scp-test-upload.rpm johnnyappleseed@login-12-34.pod.penguincomputing.com:/home/johnnyappleseed/johnnyappleseed-shared
Verification code: <-- If you have 2FA enabled
scp-test-upload.rpm                                                   100%  41MB   5.8KB/s   00:07
PS C:\Users\johnnyappleseed\Downloads>
PS C:\Users\johnnyappleseed\Downloads>  cp -r .\scp-test-folder-upload\ johnnyappleseed@login-29-66.pod.penguincomputing.com:/home/johnnyappleseed/johnnyappleseed-shared
Verification code: <-- If you have 2FA enabled
nssm-2.24.zip                                                         100%  344KB   2.7MB/s   00:00
Eula.txt                                                              100% 7490   446.7KB/s   00:00
pe.zip                                                                100% 1958KB   2.5MB/s   00:00
scp-test-upload.rpm                                                   100%   41MB   5.2MB/s   00:07
SCP-Test-Upload.txt                                                   100%   63     3.8KB/s   00:00
setup-x86_64.exe                                                      100% 1197KB   5.0MB/s   00:00
PS C:\Users\johnnyappleseed\Downloads>
You can now upload/download to your POD using the PowerShell SCP tool!
Transferring Files Between MT1 and MT2 Storage
Your MT1 home directory is usually automounted on your MT2 login nodes at /mt1home/$USER. Sometimes you may need to trigger the automounter by running a command that interacts with the directory: ls -d /mt1home/$USER. If not already mounted, this will mount your MT1 home directory allowing you to copy data between both clusters.
There are two recommended commands to use when transferring data between home directories on MT1 and MT2. If you are planning on copying over a few files or a small amount of data, use the cp command. If your are planning on copying over a large amount of data, then it is recommended you use the rsync command. In either case, use the Lustre-optimized versions of these commands by loading the appropriate lustreoptimized/cp or lustreoptimized/rsync environment module:
$ module load lustreoptimized/cp lustreoptimized/rsync
$ which cp rsync
/public/apps/lustreoptimized/cp/bin/cp
/public/apps/lustreoptimized/rsync/rsync
These commands use multi-threaded copies and intelligent striping on the destination side. For more information about these Lustre-optimized commands please reference the man page documentation using the following commands:
$ man cp
$ man rsync
Please Note: The POD support team is available to help file transfers. If you need assistance please contact POD Support directly: pod@penguincomputing.com.
Use the cp command to copy a few files or directories
This example copies a directory called test and it’s contents from user johnnyappleseed’s MT1 home directory to MT2. Use the -a and -v flags to make sure to grab all the contents, including sub-directories, and report what has been copied:
$ mkdir /home/johnnyappleseed/mt1-files
$ module load lustreoptimized/cp
$ cp -av /mt1home/johnnyappleseed/test /home/johnnyappleseed/mt1-files
‘/mt1home/johnnyappleseed/test’ -> ‘/home/johnnyappleseed/mt1-files/test’
‘/mt1home/johnnyappleseed/test/results.out’ -> ‘/home/johnnyappleseed/mt1-files/test/results.out’
‘/mt1home/johnnyappleseed/test/test.sub.o17181560’ -> ‘/home/johnnyappleseed/mt1-files/test/test.sub.o17181560’
‘/mt1home/johnnyappleseed/test/test.sub’ -> ‘/home/johnnyappleseed/mt1-files/test/test.sub’
‘/mt1home/johnnyappleseed/test/test.sub.e17181560’ -> ‘/home/johnnyappleseed/mt1-files/test/test.sub.e17181560’
Please Note: The cp command will overwrite existing files without warning. One option is to make an mt1-files directory to organize transferred files before the transfer.
Use the rsync command to copy large amounts of data
The rsync command is an efficient file-copying tool. It can be used much like cp, but it skips copying a file if it has already been transferred. This is useful to keep directories in sync in different locations. This example copies a directory called test and it’s contents from user johnnyappleseed’s MT1 home directory to MT2. Use the -P, -a and -v flags to show progress of the transfer of large files, make sure to transfer all the contents, including sub-directories, and report what has been copied:
$ mkdir /home/johnnyappleseed/mt1-files
$ module load lustreoptimized/rsync
$ rsync -Pav /mt1home/johnnyappleseed/test /home/johnnyappleseed/mt1-files
sending incremental file list
test/
test/results.out
    104,857,600 100%   79.21MB/s    0:00:01 (xfr#1, to-chk=3/5)
test/test.sub
             86 100%    0.26kB/s    0:00:00 (xfr#2, to-chk=2/5)
test/test.sub.e17181560
              0 100%    0.00kB/s    0:00:00 (xfr#3, to-chk=1/5)
test/test.sub.o17181560
             32 100%    0.10kB/s    0:00:00 (xfr#4, to-chk=0/5)

sent 104,883,703 bytes  received 96 bytes  69,922,532.67 bytes/sec
total size is 104,857,718  speedup is 1.00
Please Note: The rsync command will overwrite existing files without warning. Use a separate mt1-files directory to organize files transferred from MT1.